Background

Throughout 2015 I have been posting the following articles that explain how to make an Arduino Leonardo or Arduino Micro appear as a USB Game Controller:
- Add USB Game Controller to Arduino Leonardo or Micro
- Add Up To 3 USB Game Controllers to Arduino Leonardo or Micro
- Linux Support for Arduino Leonardo / Micro USB Game Controllers
- Arduino Joystick Library
All of these articles have been building up to this article which will explain how to create the “ultimate” classic game console joystick to USB adapter.
Overview

- Joystick Mode
Each of the three classic console joysticks appear as a Game Controller. - ADAMEm Mode
Configured for use with the ADAMEm emulator. Joystick 1’s direction and fire buttons are mapped to a Game Controller and the keypad is mapped to the keyboard’s numeric keypad keys. Joystick 2 is mapped to keyboard keys (e.g. up arrow key, down arrow key, etc.). This allows ADAMEm to support two player games. Joystick 3 is not used in this mode. - MAME Mode
Configured for use with the MAME emulator. All three joysticks’ direction and fire buttons are mapped to the three Game Controllers. The numeric keys on all three joysticks are mapped to keyboard keys.
Classic Console Joysticks
Atari 2600 Joysticks
 | The Atari 2600 joysticks are the simplest of the controllers supported by this adaptor. They have a D-Subminiature Female 9 Position connector. The following table describes the function of each pin: | ||||||||||||||
 |
|
ColecoVision Controllers
 |  |
| ColecoVision Controller | ADAM Controller |
 | |
| ColecoVision Super Action Controller |
The ColecoVision and ADAM joysticks are much more complicated. In addition to the four direction control stick, they have two fire buttons (or 4 in the case of the Super Action Controller) and a 12 button keypad. Like the Atari 2600 joystick, they have a D-Subminiature Female 9 Position connector, but the pin outs have two different modes. When pin 8 is grounded, pins 1-4 are the four directions and pin 6 is the left fire button. When pin 5 is grounded, pins 1-4 are a keypad scan code and pin 6 is the right fire button. The table below lists the pin outs for the ColecoVision and ADAM controllers.
| Pin Number | Pin 8 Grounded | Pin 5 Grounded |
| 1 | Up | Bit 0 |
| 2 | Down | Bit 2 |
| 3 | Left | Bit 3 |
| 4 | Right | Bit 1 |
| 5 | Keypad Mode | Keypad Mode |
| 6 | Left Fire | Right Fire |
| 7 | Spinner | Spinner |
| 8 | Control Stick Mode | Control Stick Mode |
| 9 | Spinner | Spinner |
The keypad scan codes are listed below:
| Keypad Value | Bit 3 / Pin 3 | Bit 2 / Pin 2 | Bit 1 / Pin 4 | Bit 0 / Pin 1 | Decimal Value | Hex Value |
| 1 | 0 | 0 | 1 | 0 | 2 | 2 |
| 2 | 1 | 0 | 0 | 0 | 8 | 8 |
| 3 | 0 | 0 | 1 | 1 | 3 | 3 |
| 4 | 1 | 1 | 0 | 1 | 13 | D |
| 5 | 1 | 1 | 0 | 0 | 12 | C |
| 6 | 0 | 0 | 0 | 1 | 1 | 1 |
| 7 | 1 | 0 | 1 | 0 | 10 | A |
| 8 | 1 | 1 | 1 | 0 | 14 | E |
| 9 | 0 | 1 | 0 | 0 | 4 | 4 |
| 0 | 0 | 1 | 0 | 1 | 5 | 5 |
| * | 0 | 1 | 1 | 0 | 6 | 6 |
| # | 1 | 0 | 0 | 1 | 9 | 9 |
| Purple Fire Button | 0 | 1 | 1 | 1 | 7 | 7 |
| Blue Fire Button | 1 | 0 | 1 | 1 | 11 | B |
The solution I have developed will support Atari 2600 joysticks, ColecoVision and ADAM controllers, and most of the ColecoVision Super Action Controllers’ functions. This solution does not currently support the Spinner located below the keypad on the Super Action Controllers.
Parts List
Required Parts
| Quantity | Item |
| 1 | Arduino Leonardo - http://arduino.cc/en/Main/ArduinoBoardLeonardo or Arduino Micro - http://arduino.cc/en/Main/ArduinoBoardMicro |
| 3 | D-Subminiature Male 9 Position Connector For example: http://www.jameco.com/webapp/wcs/stores/servlet/Product_10001_10001_12504_-1, http://www.jameco.com/webapp/wcs/stores/servlet/Product_10001_10001_1975029_-1, etc. |
| 3 | LEDs (any color(s) you want) |
| 3 | 330 Ohm Resistors (or whatever is appropriate for the LEDs chosen) |
| 1 | Momentary Push Button |
| 1 - 3 | Classic Console Joysticks |
| 1 | Solderless Plugin Breadboard or Solderable PC Breadboard |
Optional Parts
| Quantity | Item |
| 1 | Project Box |
Hardware
D-Sub Male 9 Position Connector Preparation

Depending on the type of D-Sub Male 9 Position connector you use, you may need to do some work to get the connector ready to use. In my case I used a connector and a SparkFun Serial DB9 Breakout (https://www.sparkfun.com/products/retired/8552), so I needed to do a little soldering to get it ready to use.

Momentary Push Button Preparation
Depending on what type of momentary push button you use, you many need to solder some wires to the push button so it can be connected to the Arduino.

LED Preparation
Depending on the type of LED you use and how you plan to package the final device, you many need to solder some wires to the LEDs so they can be connected to the Arduino.
Solderable PC Breadboard Preparation
For my project I used an Arduino Micro (http://arduino.cc/en/Main/ArduinoBoardMicro) which I soldered to a solderable PC breadboard. I wanted to make sure I had good connections between my Arduino Micro and my joystick lines, so I threaded very small wires through the breadboard to act as the conductive traces.


Wiring Diagram
The following diagram shows how to connect the Arduino Leonardo or Arduino Micro to the three, D-Subminiature male 9-pin connectors, resistors, LEDs, and momentary switch.

The following table describes how the pins of the Arduino are connected to the Joystick’s D-Subminiature pins.
| Arduino | Description | Joystick 1 | Joystick 2 | Joystick 3 |
| 0 | RX – Reserved for serial communication | |||
| 1 | TX – Reserved for serial communication | |||
| 2 | UP / Data 0 | 1 | 1 | 1 |
| 3 | DOWN / Data2 | 2 | 2 | 2 |
| 4 | LEFT / Data 3 | 3 | 3 | 3 |
| 5 | RIGHT / Data 1 | 4 | 4 | 4 |
| 6 | FIRE | 6 | 6 | 6 |
| 7 | Spinner A | 7 | 7 | 7 |
| 8 | Spinner B | 9 | 9 | 9 |
| 9 | Emulation Mode Toggle Pin – Connect one end of momentary switch to this pin and connect the other end to ground | |||
| 10 | ADAMEm Mode Indicator – connect to 330 Ohm resistor, 330 Ohm resistor is then connected to LED, which is connected to ground | |||
| 11 | MAME Mode Indicator – connect to 330 Ohm resistor, 330 Ohm resistor is then connected to LED, which is connected to ground | |||
| 12 | Joystick Mode Indicator – connect to 330 Ohm resistor, 330 Ohm resistor is then connected to LED, which is connected to ground | |||
| 13 | Fire Monitor Pin – on-board led | |||
| A0 | Joystick 1 Keypad Mode | 5 | ||
| A1 | Joystick 1 Control Stick Mode | 8 | ||
| A2 | Joystick 2 Keypad Mode | 5 | ||
| A3 | Joystick 2 Control Stick Mode | 8 | ||
| A4 | Joystick 3 Keypad Mode | 5 | ||
| A5 | Joystick 3 Control Stick Mode | 8 |


Enclosure
So the final product would look nice (and I would not worry about my kids breaking any of the wires) I put the adapter into a project box. I had to drill holes for the momentary switch, the LEDs, and the d-subminiature connectors.


To finish it up I put some labels on the connectors and on the LED mode indicators.

Software
Arduino made a major change to how they implemented the USB HID functionality in Arduino IDE Version 1.6.6, so I have two different sets of instructions depending on which version of the Arduino IDE you are using. I recommend using Version 1.6.6 or above if you can, because it is much simpler.
Arduino Version 1.6.5 and Below
- Follow the instructions provided in the following article to add 3 USB Game Controllers to the Arduino Leonardo or Arduino Micro: Add Up To 3 USB Game Controllers to Arduino Leonardo or Micro.
- Download and install the ClassicController library from the Arduino-1.6.5 branch of the MHeironimus/ClassicJoystickAdaptor GitHub repository. This library can be installed by copying it to the Arduino libraries folder (typically %userprofile%\Documents\Arduino\libraries).
- Download the ClassicJoystickAdaptor.ino sketch file from the Arduino-1.6.5 branch of the folder of the MHeironimus/ClassicJoystickAdaptor GitHub repository and open it in the Arduino IDE.
- Compile and upload the sketch file to the Arduino Leonardo or Arduino Micro.
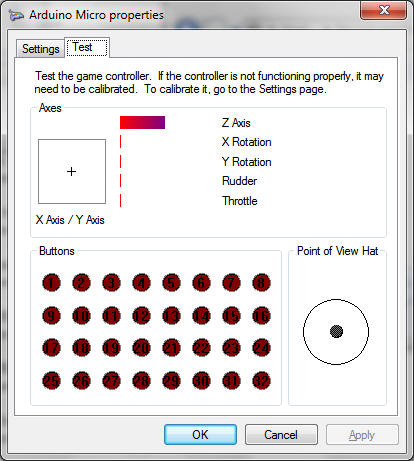
- The adapter can be testing using the “Game Controllers” dialog in Microsoft Windows. See “Add Up To 3 USB Game Controllers to Arduino Leonardo or Micro” (http://mheironimus.blogspot.com/2015/04/add-up-to-3-usb-game-controllers-to.html) for more details on testing the adapter.
Arduino version 1.6.6 and Above
- Download and install the Arduino Joystick Library from the MHeironimus/ArduinoJoystickLibrary GitHub repository. This library can be installed by copying it to the Arduino libraries folder (typically %userprofile%\Documents\Arduino\libraries). For more information on how to install this library, see the following article: Arduino Joystick Library.
- Download and install the ClassicController library from the master branch of the MHeironimus/ClassicJoystickAdaptor GitHub repository. This library can be installed by copying it to the Arduino libraries folder (typically %userprofile%\Documents\Arduino\libraries).
- Download the ClassicJoystickAdaptor.ino sketch file from the master branch of the folder of the MHeironimus/ClassicJoystickAdaptor GitHub repository and open it in the Arduino IDE.
- Compile and upload the sketch file to the Arduino Leonardo or Arduino Micro.
- The adapter can be testing using the “Game Controllers” dialog in Microsoft Windows. See “Arduino Joystick Library” (http://mheironimus.blogspot.com/2015/11/arduino-joystick-library.html) for more details on testing the adapter.
Final Product


