As Arduino projects get more complex, the need for unit testing becomes more apparent. Also, in order to utilize techniques like Test Driven Development (TDD), a fast and effecting unit testing strategy is needed. The following are some requirements I had for unit testing Arduino code:
- Fast – Could be executed on the development machine, not the Arduino itself
- Compatible – It supported the file structure required by the Arduino IDE
- Easy – Something that is easy to install, setup, and use
- Supportable – It is popular enough to have a plenty of on-line documentation and a sizable userbase
After evaluating several options, I settled on using GoogleTest (https://github.com/google/googletest) via Visual Studio 2022 (https://visualstudio.microsoft.com/vs). The following article describes how to install the software needed. This article assumes you already have the Arduino IDE installed.
Setup
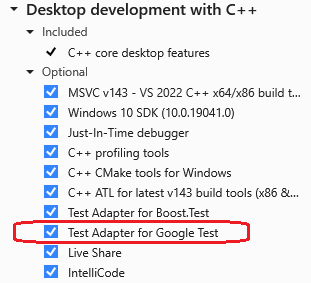
Go to the Visual Studio website (https://visualstudio.microsoft.com/vs) and download and run the Visual Studio installer. The Community edition is free. Be sure to select the “Desktop development with C++” option.

This will cause the Test Adapter for Google Test to be installed.
Create Visual Studio Project
Run Visual Studio and select “Create a new project” when prompted.

Scroll down the list and select the “Google Test” project template.

Fill out the remaining fields and click Create. Be sure to give the project the same name as the Arduino Sketch file (i.e., *.ino). This allows both the Arduino IDE and Visual Studio to open the Sketch file. The default “Test Project Configuration” options will work for most projects.

A new project will be created that looks something like the following:

The new project will contain one sample unit test. The “Test Explorer” window can be used to execute the sample unit test. Click the “Run All Tests In View” button to build the project and run the sample unit test.

The results of running the sample unit test should look something like this:

Turning Off Precompiled Header
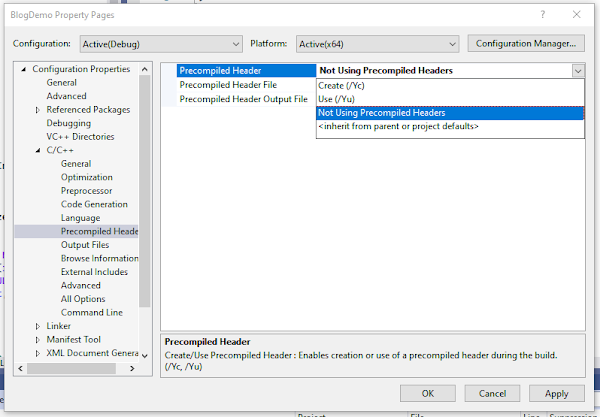
To allow both the Arduino IDE and Visual Studio to use the same source files, I recommend not using a precompiled header. Open the Project Properties dialog and select the “Configuration Properties – C/C++ - Precompiled Header” page. Select the “Not Using Precompiled Headers” for the “Precompiled Header” option.
Replace the following line at the top of the test.cpp file:
#include "pch.h"
With the following:
#include "gtest/gtest.h"
Then remove the pch.h and pch.cpp files from the project. Re-run the sample unit tests to verify things are still working.
Adding Arduino Code
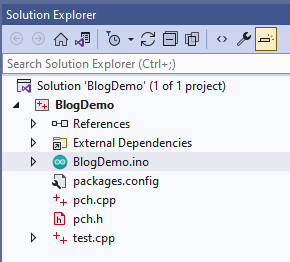
The project is now ready for the Arduino code to be added. As long as the project was named the same as the Sketch file, the Sketch file should be able to be copied (and any additional files needed) into the project folder. Once the file has been added to the project folder, it will need to be added to the Visual Studio Project.

Separate Testable Code
Any Arduino code that will be tested should be pulled out of the Sketch file and moved into separate classes and/or functions. I tend to leave any logic that interacts directly with the Arduino hardware in the Sketch file and pull the rest of the logic into functions or classes that can be tested. In this example I pulled out all of the logic into a class called SystemState (i.e., sysstate.h and sysstate.cpp).

Writing Unit Tests
Unit tests can now be added to the project (either to the test.cpp provided by the template or by adding new files to the project).

GoogleTest Highlights
Setup and Teardown Functions
To write a series of unit tests that share the same setup and/or teardown code, create a new class that derives from ::testing::Test:
1 2 3 4 5 6 7 8 9 10 11 12 13 14 15 16 17 18 19 20 21 22 | class SystemStateTest : public ::testing::Test { protected: void SetUp() override { button_state[0] = 0; button_state[1] = 0; set_button_value_count[0] = 0; set_button_value_count[1] = 0; set_new_read_next_mock_value(""); target = new SystemState( &button_press, &switch_change, &mock_read_next_byte, &set_button_value ); } void TearDown() override { delete target; } SystemState* target; }; |
Protected SetUp and TearDown functions can be defined that will run before and after each test. Unit tests that leverage the SetUp and TearDown functions are defined using the TEST_F macro:
1 2 3 4 5 6 | TEST_F(SystemStateTest, UpdateStateButton0DownAndUp) { target->update_state(BUTTON_DOWN, BUTTON_UP, SWITCH_OFF); target->update_state(BUTTON_UP, BUTTON_UP, SWITCH_OFF); EXPECT_EQ(1, button_state[0]); EXPECT_EQ(0, button_state[1]); } |
Code Coverage
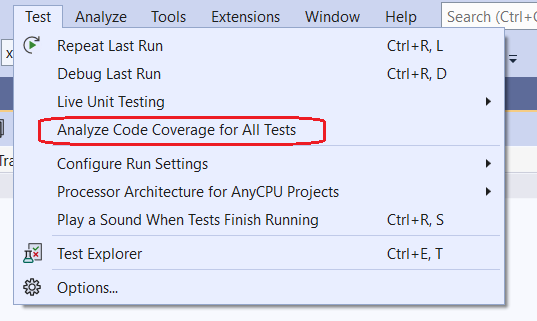
If you are fortunate enough to be using Visual Studio Enterprise, you can also view your unit test’s code coverage. This functionality can be accessed via the “Test – Analyze Code Coverage for All Tests” menu option.
Sample Results:


Conclusion
Software in embedded systems, like the Arduino, can have unit tests and be written using techniques like TDD. Tools like Visual Studio and GoogleTest can make writing and running unit test easier.


