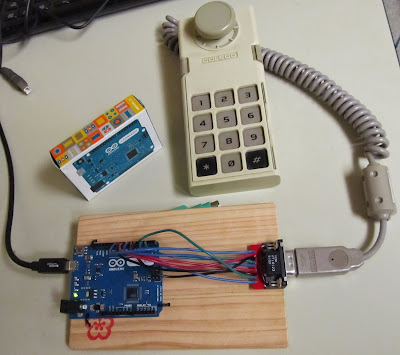
This article explains how to create a ColecoVision cartridge reader using an Arduino UNO (or similar product) and a PC.
What You Need
- Arduino UNO (or similar board) - http://arduino.cc/en/Main/ArduinoBoardUno
- Two 8-bit Shift Registers (74HC595 or similar chips) [this could also be implemented with a single 16-bit Shift Register (STP16C596), but I have not tested this implementation]
- Standard Card Edge Connector 15 Position (CONN SEC II 15 POS 100C/L) - http://www.mouser.com/ProductDetail/TE-Connectivity-AMP/5530841-2/?qs=sGAEpiMZZMvlX3nhDDO4AIGhITdGxFYIj%252be5B1rBFtQ%3d
- Prototyping PC Board – to mount the 15 position standard card edge connector
- Wire
- ColecoVision Cartridge to read
ColecoVision Cartridge Overview
ColecoVision cartridges typically come in sizes of 8K, 16K, 24K, or 32K. I have also encountered a few 12K cartridges. They generally have one to four 8K rom chips, although I have seen a few exceptions. For example, the Pitfall cartridge I own has a single 16K rom chip.
ColecoVision Cartridge Pin Outs
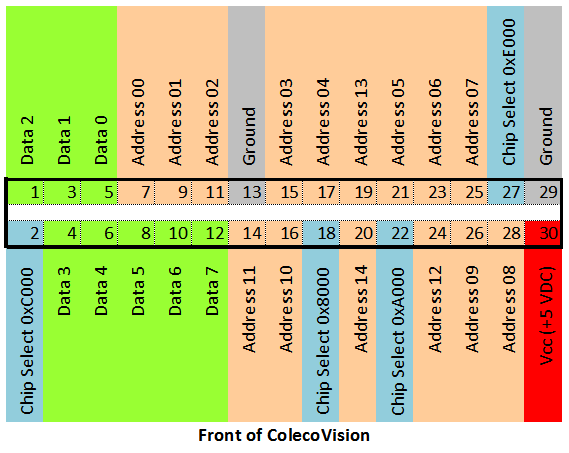
ColecoVision cartridges have 15 address pins, 8 data pins, 4 low-enabled chip select pins, 2 ground pins, and a Vcc pin. The layout of the 30 ColecoVision pins is shown below:Not Enough Pins
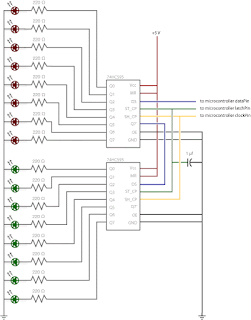
The Arduino UNO only has 20 pins that can be used for digital I/O. Two of these are used for the serial communication to the host PC, and I avoid using pin 13, since it is wired to the LED on the Arduino board. That leaves only 17 pins on the Arduino to connect to the 27 pins (15 address, 8 data, and 4 chip select) on the ColecoVision cartridge.Shift Register Circuit
Connections Table
| From | Pin | To | Pin |
| Cartridge Connector (A01) | 9 | 74HC595 #1 | 1 |
| Cartridge Connector (A02) | 11 | 74HC595 #1 | 2 |
| Cartridge Connector (A03) | 15 | 74HC595 #1 | 3 |
| Cartridge Connector (A04) | 17 | 74HC595 #1 | 4 |
| Cartridge Connector (A05) | 21 | 74HC595 #1 | 5 |
| Cartridge Connector (A06) | 23 | 74HC595 #1 | 6 |
| Cartridge Connector (A07) | 25 | 74HC595 #1 | 7 |
| Arduino | GND | 74HC595 #1 | 8 |
| Arduino | Vcc | 74HC595 #1 | 10 |
| Arduino | 11 | 74HC595 #1 | 11 |
| Arduino | 12 | 74HC595 #1 | 12 |
| Arduino | GND | 74HC595 #1 | 13 |
| Arduino | 10 | 74HC595 #1 | 14 |
| Cartridge Connector (A00) | 7 | 74HC595 #1 | 15 |
| Arduino | Vcc | 74HC595 #1 | 16 |
| Cartridge Connector (A09) | 26 | 74HC595 #2 | 1 |
| Cartridge Connector (A10) | 16 | 74HC595 #2 | 2 |
| Cartridge Connector (A11) | 14 | 74HC595 #2 | 3 |
| Cartridge Connector (A12) | 24 | 74HC595 #2 | 4 |
| Cartridge Connector (A13) | 19 | 74HC595 #2 | 5 |
| Cartridge Connector (A14) | 20 | 74HC595 #2 | 6 |
| Arduino | GND | 74HC595 #2 | 8 |
| Arduino | Vcc | 74HC595 #2 | 10 |
| Arduino | 11 | 74HC595 #2 | 11 |
| Arduino | 12 | 74HC595 #2 | 12 |
| Arduino | GND | 74HC595 #2 | 13 |
| 74HC595 #1 | 9 | 74HC595 #2 | 14 |
| Cartridge Connector (A08) | 28 | 74HC595 #2 | 15 |
| Arduino | Vcc | 74HC595 #2 | 16 |
Chip Select Pins
The four chip select pins on the cartridge correspond to the four ROM chips that may be present in the cartridge. The first chip select pin (Chip Select 0x8000) should be toggled (high to low) when reading any addresses between 0x8000 and 0x9FFF. Likewise, Chip Select 0xA000 should be toggled for addresses between 0xA000 and 0xBFFF, Chip Select 0xC000 for 0xC000 through 0xDFFF, and Chip Select 0xE000 for 0xE000 through 0xFFFF.| From | Pin | To | Pin |
| Arduino | A0 | Cartridge Connector (Chip Select 0x8000) | 18 |
| Arduino | A1 | Cartridge Connector (Chip Select 0xA000) | 22 |
| Arduino | A2 | Cartridge Connector (Chip Select 0xC000) | 2 |
| Arduino | A3 | Cartridge Connector (Chip Select 0xE000) | 27 |
Data, Vcc, and Ground Pins
Once the address pins and chip select pins have been wired up, the data, Vcc, and ground pins of the cartridge can be connected to the Arduino.| From | Pin | To | Pin |
| Arduino | Vcc | Cartridge Connector (Vcc) | 30 |
| Arduino | GND | Cartridge Connector (GND) | 13, 29 |
| Arduino | 2 | Cartridge Connector (Data 0) | 5 |
| Arduino | 3 | Cartridge Connector (Data 1) | 3 |
| Arduino | 4 | Cartridge Connector (Data 2) | 1 |
| Arduino | 5 | Cartridge Connector (Data 3) | 4 |
| Arduino | 6 | Cartridge Connector (Data 4) | 6 |
| Arduino | 7 | Cartridge Connector (Data 5) | 8 |
| Arduino | 8 | Cartridge Connector (Data 6) | 10 |
| Arduino | 9 | Cartridge Connector (Data 7) | 12 |
Arduino Sketch File
The following Arduino Sketch file causes the Arduino to wait for a line from the host computer. If the line read in is “READ ALL”, the Arduino will do the following:- Send a “START:” line to the host computer.
- Read all of the data from the cartridge and send it to the host computer in HEX, one byte per line.
- Send a “:END” line to the host computer.
// ColecoVision / ADAM Cartridge Reader
// for the Arduino UNO
// 2014-11-25
//----------------------------------------------------------------------------------

// Arduino Pins
const int gcChipSelectLine[4] = { A0, A1, A2, A3 };
const int gcShiftRegisterClock = 11;
const int gcStorageRegisterClock = 12;
const int gcSerialAddress = 10;
const int gcDataBit[8] = { 2, 3, 4, 5, 6, 7, 8, 9 };

// Shifts a 16-bit value out to a shift register.
// Parameters:
//   dataPin - Arduino Pin connected to the data pin of the shift register.
//   clockPin - Arduino Pin connected to the data clock pin of the shift register.
//----------------------------------------------------------------------------------
void shiftOut16(int dataPin, int clockPin, int bitOrder, int value)
{
  // Shift out highbyte for MSBFIRST
  shiftOut(dataPin, clockPin, bitOrder, (bitOrder == MSBFIRST ? (value >> 8) : value));
  // shift out lowbyte for MSBFIRST
  shiftOut(dataPin, clockPin, bitOrder, (bitOrder == MSBFIRST ? value : (value >> 8)));
}

// Select which chip on the cartridge to read (LOW = Active).
// Use -1 to set all chip select lines HIGH.
//----------------------------------------------------------------------------------
void SelectChip(byte chipToSelect)
{
  for(int currentChipLine = 0; currentChipLine < 4; currentChipLine++)
  {
    digitalWrite(gcChipSelectLine[currentChipLine], (chipToSelect != currentChipLine));
  }
}

// Set Address Lines
//----------------------------------------------------------------------------------
void SetAddress(unsigned int address)
{
    SelectChip(-1);

    // Disable shift register output while loading address
    digitalWrite(gcStorageRegisterClock, LOW);

    // Write Out Address
    shiftOut16(gcSerialAddress, gcShiftRegisterClock, MSBFIRST, address);

    // Enable shift register output
    digitalWrite(gcStorageRegisterClock, HIGH);

    int chipToSelect;

    if (address < 0xA000) {
      chipToSelect = 0;
    } else if (address < 0xC000) {
      chipToSelect = 1;
    } else if (address < 0xE000) {
      chipToSelect = 2;
    } else {
      chipToSelect = 3;
    }
    SelectChip(chipToSelect);
}

// Read data lines
//----------------------------------------------------------------------------------
void ReadDataLines()
{
  const char cHexLookup[16] = {
    '0', '1', '2', '3', '4', '5', '6', '7',
    '8', '9', 'A', 'B', 'C', 'D', 'E', 'F'};

  int highNibble = 0;
  int lowNibble = 0;
  boolean dataBits[8];
  char byteReadHex[4];

  for(int currentBit = 0; currentBit < 8; currentBit++)
  {
    dataBits[currentBit] = digitalRead(gcDataBit[currentBit]);
  }

  highNibble = (dataBits[7] << 3) + (dataBits[6] << 2) + (dataBits[5] << 1) + dataBits[4];
  lowNibble = (dataBits[3] << 3) + (dataBits[2] << 2) + (dataBits[1] << 1) + dataBits[0];

  Serial.write(cHexLookup[highNibble]);
  Serial.write(cHexLookup[lowNibble]);
  Serial.println();
}

// Read all of the data from the cartridge.
//----------------------------------------------------------------------------------
void ReadCartridge()
{
  unsigned int baseAddress = 0x8000;

  Serial.println("START:");

  // Read Current Chip (cartridge is 32K, each chip is 8k)
  for (unsigned int currentAddress = 0; currentAddress < 0x8000; currentAddress++)
  {
    SetAddress(baseAddress + currentAddress);
    ReadDataLines();
  }

  Serial.println(":END");
}

// Returns the next line from the serial port as a String.
//----------------------------------------------------------------------------------
String SerialReadLine()
{
  const int BUFFER_SIZE = 81;
  char lineBuffer[BUFFER_SIZE];
  int currentPosition = 0;
  int currentValue;

  do
  {
    // Read until we get the next character
    do
    {
      currentValue = Serial.read();
    } while (currentValue == -1);

    // ignore '\r' characters
    if (currentValue != '\r')
    {
      lineBuffer[currentPosition] = currentValue;
      currentPosition++;
    }

  } while ((currentValue != '\n') && (currentPosition < BUFFER_SIZE));
  lineBuffer[currentPosition-1] = 0;

  return String(lineBuffer);
}

// Indicate to remote computer Arduino is ready for next command.
//----------------------------------------------------------------------------------
void ReadyForCommand()
{
  Serial.println("READY:");
}

void setup()
{
  // Setup Serial Monitor
  Serial.begin(57600);

  // Setup Chip Select Pins
  for(int chipLine = 0; chipLine < 4; chipLine++)
  {
    pinMode(gcChipSelectLine[chipLine], OUTPUT);
  }

  // Setup Serial Address Pins
  pinMode(gcShiftRegisterClock, OUTPUT);
  pinMode(gcStorageRegisterClock, OUTPUT);
  pinMode(gcSerialAddress, OUTPUT);

  // Setup Data Pins
  for(int currentBit = 0; currentBit < 8; currentBit++)
  {
    pinMode(gcDataBit[currentBit], INPUT_PULLUP);
  }

  while (!Serial) {
    ; // wait for serial port to connect. Needed for Leonardo only.
  }

  // Reset Output Lines
  SetAddress(0);

  ReadyForCommand();
}

void loop()
{
  if (Serial.available() > 0)
  {
    String lineRead = SerialReadLine();
    lineRead.toUpperCase();

    if (lineRead == "READ ALL")
    {
      ReadCartridge();
    } // lineRead = "Read All"

    ReadyForCommand();

  } // Serial.available
}
If you are fortunate enough to be using an Arduino board with 29 or more digital I/O pins (e.g. the Arduino Due, Arduino MEGA ADK, Arduino Mega 2560, etc.) and you are not using the shift register circuit, the SetAddress function in the sketch file above will need to be re-written.
PC Software
The Windows executable and associated sketch file can be downloaded at ColecoVisionCartridgeReader.zip. The source code for the application and associated sketch file can be downloaded at ColecoVisionCartridgeReaderSource.zip. The latest version of the source code can be found on GitHub at MHeironimus/ColecoVisionCartridgeReader.
After the program reads the contents of the cartridge from the Arduino, it truncates any 8K sections from the end of the cartridge that are blank (i.e. all bytes are set to FF).
Reading a Cartridge
Recommended steps to follow:
- Insert the cartridge into the connector.
- Plug the Arduino into the PC.
- Start the ColecoVisionCartridgeReader.exe application.
- Select File -> Read From Arduino from the main menu.
- Verify the settings are correct and click the Read button.
Observations
The first two bytes of all ColecoVision cartridges are 55 and AA. If the AA comes first, the cartridge displays the standard ColecoVision title screen (e.g. standard ColecoVision cartridges like Donkey Kong, Mouse Trap, Zaxxon, etc.). If the 55 comes first, the cartridge skips the standard title screen (e.g. third-party cartridges like Q*Bert, Frogger, Pitfall, etc.).Interesting Cartridges to Read
24k Version
Possible Future Enhancements
- Detect 12K cartridges and truncate the duplicate 4K at the end of the cartridge image.
- Have the Arduino check the first two bytes of the cartridge to verify they are correct before reading the entire cartridge.
- Speed up the transfer of the cartridge data by sending multiple bytes on the same line.


