Saturday, July 09, 2022

Simple Arduino Leonardo USB Game Pad

Parts

Required Parts

Optional Parts

Hardware Assembly

  1. If using a case, place the Arduino Leonardo inside the case per the instructions provided with the case.
  2. Insert the Funduino Joystick Shield onto the Arduino Leonardo.

Software

  1. Download the latest v2 version of the Arduino Joystick Library from https://github.com/MHeironimus/ArduinoJoystickLibrary: https://github.com/MHeironimus/ArduinoJoystickLibrary/archive/refs/heads/version-2.0.zip.
  2. To install the library in the Arduino IDE, select Sketch > Include Library > Add .ZIP Library.... Browse to where the downloaded ZIP file is located and click Open. The Joystick library's examples will now appear under File > Examples > Joystick.
  3. Open the Funduino Joystick Shield example by selecting File > Examples > Joystick > FunduinoJoystickShield. Verify the correct Port is selected in the Arduino IDE and select Upload.
  4. On Microsoft Windows, the joystick can be tested using the “Game Controllers” dialog.

Saturday, January 08, 2022

Using GoogleTest to Unit Test Arduino Code

As Arduino projects get more complex, the need for unit testing becomes more apparent. Also, in order to utilize techniques like Test Driven Development (TDD), a fast and effecting unit testing strategy is needed. The following are some requirements I had for unit testing Arduino code:

  • Fast – Could be executed on the development machine, not the Arduino itself
  • Compatible – It supported the file structure required by the Arduino IDE
  • Easy – Something that is easy to install, setup, and use
  • Supportable – It is popular enough to have a plenty of on-line documentation and a sizable userbase

After evaluating several options, I settled on using GoogleTest (https://github.com/google/googletest) via Visual Studio 2022 (https://visualstudio.microsoft.com/vs). The following article describes how to install the software needed. This article assumes you already have the Arduino IDE installed.

Setup

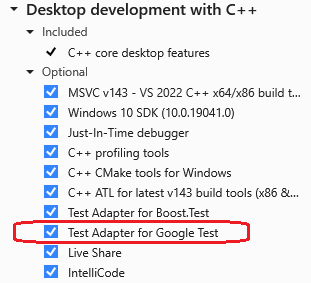
Go to the Visual Studio website (https://visualstudio.microsoft.com/vs) and download and run the Visual Studio installer. The Community edition is free. Be sure to select the “Desktop development with C++” option.

This will cause the Test Adapter for Google Test to be installed.

Create Visual Studio Project

Run Visual Studio and select “Create a new project” when prompted.

Scroll down the list and select the “Google Test” project template.

Fill out the remaining fields and click Create. Be sure to give the project the same name as the Arduino Sketch file (i.e., *.ino). This allows both the Arduino IDE and Visual Studio to open the Sketch file. The default “Test Project Configuration” options will work for most projects.

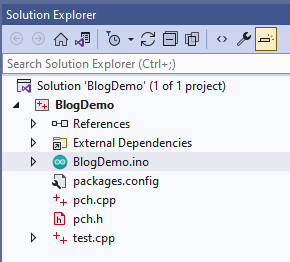
A new project will be created that looks something like the following:

The new project will contain one sample unit test. The “Test Explorer” window can be used to execute the sample unit test. Click the “Run All Tests In View” button to build the project and run the sample unit test.

The results of running the sample unit test should look something like this:

Turning Off Precompiled Header

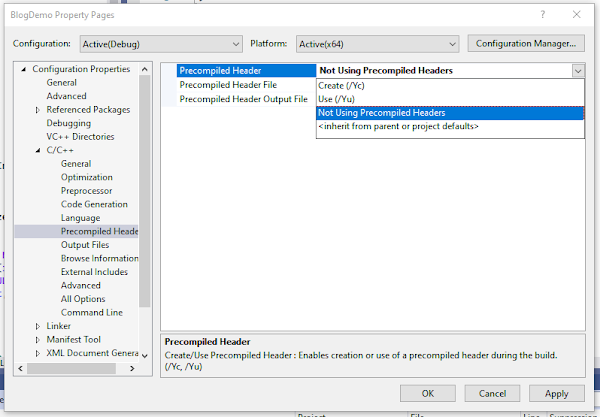
To allow both the Arduino IDE and Visual Studio to use the same source files, I recommend not using a precompiled header. Open the Project Properties dialog and select the “Configuration Properties – C/C++ - Precompiled Header” page. Select the “Not Using Precompiled Headers” for the “Precompiled Header” option.

Replace the following line at the top of the test.cpp file:

#include "pch.h"

With the following:

#include "gtest/gtest.h"

Then remove the pch.h and pch.cpp files from the project. Re-run the sample unit tests to verify things are still working.

Adding Arduino Code

The project is now ready for the Arduino code to be added. As long as the project was named the same as the Sketch file, the Sketch file should be able to be copied (and any additional files needed) into the project folder. Once the file has been added to the project folder, it will need to be added to the Visual Studio Project.

Separate Testable Code

Any Arduino code that will be tested should be pulled out of the Sketch file and moved into separate classes and/or functions. I tend to leave any logic that interacts directly with the Arduino hardware in the Sketch file and pull the rest of the logic into functions or classes that can be tested. In this example I pulled out all of the logic into a class called SystemState (i.e., sysstate.h and sysstate.cpp).

Writing Unit Tests

Unit tests can now be added to the project (either to the test.cpp provided by the template or by adding new files to the project).

GoogleTest Highlights

Setup and Teardown Functions

To write a series of unit tests that share the same setup and/or teardown code, create a new class that derives from ::testing::Test:

 1
 2
 3
 4
 5
 6
 7
 8
 9
10
11
12
13
14
15
16
17
18
19
20
21
22
class SystemStateTest : public ::testing::Test {
protected:
    void SetUp() override {
        button_state[0] = 0;
        button_state[1] = 0;
        set_button_value_count[0] = 0;
        set_button_value_count[1] = 0;
        set_new_read_next_mock_value("");
        target = new SystemState(
            &button_press,
            &switch_change,
            &mock_read_next_byte,
            &set_button_value
        );
    }

    void TearDown() override {
        delete target;
    }

    SystemState* target;
};

Protected SetUp and TearDown functions can be defined that will run before and after each test. Unit tests that leverage the SetUp and TearDown functions are defined using the TEST_F macro:

1
2
3
4
5
6
TEST_F(SystemStateTest, UpdateStateButton0DownAndUp) {
    target->update_state(BUTTON_DOWN, BUTTON_UP, SWITCH_OFF);
    target->update_state(BUTTON_UP, BUTTON_UP, SWITCH_OFF);
    EXPECT_EQ(1, button_state[0]);
    EXPECT_EQ(0, button_state[1]);
}

Code Coverage

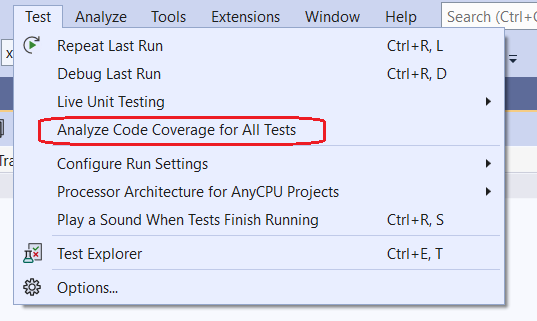
If you are fortunate enough to be using Visual Studio Enterprise, you can also view your unit test’s code coverage. This functionality can be accessed via the “Test – Analyze Code Coverage for All Tests” menu option.

Sample Results:

Conclusion

Software in embedded systems, like the Arduino, can have unit tests and be written using techniques like TDD. Tools like Visual Studio and GoogleTest can make writing and running unit test easier.

Sunday, June 28, 2020

TypeScript hasDuplicates Function

Here is a simple TypeScript function that can be used to determine if a strongly typed TypeScript array contains duplicate items:

function hasDuplicates<T>(inputArray: T[]): boolean {
    return inputArray.length !== (new Set(inputArray)).size;
}

Example usage:

Sunday, May 24, 2020

Unicode Filename Support in TAR Files in Windows 10

No Unicode Filename Support in ZIP Files in Windows 10

I recently discovered that the built-in ZIP file support in Windows 10 does not support Unicode filenames. For example, I had a file name “みんな一列に.jpg” and tried to add it to a ZIP file, but got the following error:

No Unicode Filename Support in TAR Files in Windows 10

Windows 10 has added built-in support for TAR files through a command line tool. Since I was unable to put files with Unicode filenames into ZIP files in Windows, I tried using this tool to put them into a TAR file. I used the following command to add the “みんな一列に.jpg” file to a new TAR file called test.tar:
D:\Temp>dir /b *.jpg
みんな一列に.jpg

D:\Temp>tar -cvf test.tar *.jpg
a ??????.jpg
Unfortunately, it replaced the Unicode characters with question marks (?). This replacement of characters can also be seen when performing the following command:
D:\Temp>tar -tvf test.tar
-rw-rw-rw-  0 0      0       37044 Nov 10  2004 ??????.jpg

WSL to the Rescue

Windows 10 has the ability to run UNIX command line tools using the Windows Subsystem for Linux. See https://docs.microsoft.com/en-us/windows/wsl/install-win10 for instructions on how to install the Windows System for Linux. Linux also contains a command line tool for creating TAR files. I attempted to create a TAR file containing the “みんな一列に.jpg” file using the following command in an Ubuntu bash shell:
matthew@KIKI2015:/mnt/d/Temp$ ls *.jpg
みんな一列に.jpg
matthew@KIKI2015:/mnt/d/Temp$ tar -cvf test.tar *.jpg
みんな一列に.jpg
I first verified the filename was preserved using the following command:
matthew@KIKI2015:/mnt/d/Temp$ tar -tvf test.tar
-rwxrwxrwx matthew/matthew 37044 2004-11-10 00:54 みんな一列に.jpg
I then extracted the file to a new folder using the following command:
matthew@KIKI2015:/mnt/d/Temp$ cd test
matthew@KIKI2015:/mnt/d/Temp/test$ tar -xvf ../test.tar
みんな一列に.jpg
It even appeared correctly in Windows File Explore:

Back to Windows 10

I was curious to see how the Windows 10 tar program would react to the TAR file created in Linux, so I tried listing the contents of the TAR file using a Windows 10 command prompt window:
D:\Temp>tar -tvf test.tar
-rwxrwxrwx  0 matthew matthew 37044 Nov 10  2004 pü+péôpü¬S+Çsêùpü½.jpg
Unsurprisingly it did not interpret the filename correctly. Interestingly, extract the file resulted in yet a different filename: みんな一列に.jpg.

Hopefully Microsoft will add support for Unicode filenames in ZIP or TAR files in a future update to Windows, but until then, WSL can be used.

Sunday, November 25, 2018

Combining mp4 Files Without Re-encoding Using FFmpeg on Windows Subsystem for Linux

I recently used FFmpeg installed on the Windows Subsystem for Linux on my Windows 10 machine to combine some mp4 video files without re-encoding the files. Being able to do this without re-encoding makes the process much quicker and does not result in image degradation.

Install the Windows Subsystem for Linux

If it is not already installed, you will need to install the Windows Subsystem for Linux. Instructions for doing this can be found at https://docs.microsoft.com/en-us/windows/wsl/install-win10. I have the Ubuntu distro installed (https://www.microsoft.com/en-us/p/ubuntu/9nblggh4msv6).

Install FFmpeg

To install FFmpeg (https://ffmpeg.org/) on Ubuntu open the Ubuntu command line and enter the following:
sudo apt install ffmpeg

Create Merge File

Using the text editor of your choice, create a text file that contains the list of mp4 files you want to combine. For this example I called the file input.txt. The format of this file is as follows:
file 'part1.mp4'
file 'part2.mp4'

Combine mp4 Files

The following command can be used to merge the files listed in the text file from the step above into a single mp4 output file without re-encoding the files:
ffmpeg -f concat -i input.txt -c copy output.mp4
The name of the new mp4 file in the example above is output.mp4.

Saturday, November 10, 2018

Trimming mp4 Files Without Re-encoding Using FFmpeg on Windows Subsystem for Linux

I recently used FFmpeg installed on the Windows Subsystem for Linux on my Windows 10 machine to trim the beginning and ending off of some mp4 video files without re-encoding the files. Being able to do this without re-encoding makes the process much quicker and does not result in image degradation.

Install the Windows Subsystem for Linux

If it is not already installed, you will need to install the Windows Subsystem for Linux. Instructions for doing this can be found at https://docs.microsoft.com/en-us/windows/wsl/install-win10. I have the Ubuntu distro installed (https://www.microsoft.com/en-us/p/ubuntu/9nblggh4msv6).

Install FFmpeg

To install FFmpeg (https://ffmpeg.org/) on Ubuntu open the Ubuntu command line and enter the following:
sudo apt install ffmpeg

Trim the Beginning of a Video

The following command can be used to trim the first 30 seconds off the front of an mp4 file:
ffmpeg -ss 00:00:30 -i input.mp4 -c copy output.mp4

Trim the Ending of a Video

The following command can be used to trim an mp4 file at a specified position. In this example it copies the first thirty seconds of the input.mp4 file and copies it to the output.mp4 file.
ffmpeg -i input.mp4 -c copy -to 00:00:30 output.mp4
Another way to accomplish this is to specify a duration. In this example it copies the first fifteen seconds of the input.mp4 file and copies it to the output.mp4 file.
ffmpeg -i input.mp4 -c copy -t 00:00:15 output.mp4

Trim the Beginning and Ending of a Video

The following command can be used to trim the first 30 seconds off the front of an mp4 file and then copy the next three minutes and forty five seconds. The resulting file will be three minutes and forty five seconds long:
ffmpeg -ss 00:00:30 -i input.mp4 -c copy -t 00:03:45 output.mp4

Wednesday, December 20, 2017

Find a Penny, Pick It Up...

A coworker of mine was working on a TypeScript/JavaScript application that ran in a web browser. The application would display a dollar amount that was about to be charged to a customer's credit card. When the customer acknowledged the amount, the customer would be taken to a page hosted by the payment processor to actually perform the transaction. This seemed to be working correctly, but our QA tester found that certain dollar amounts, like $8.95, would show in our application as $8.95, but would be displayed as $8.94 on the payment processor's page.

The payment processors required monetary amounts to be sent in as cents, rather than dollars. For example, $54.12 would be sent as 5412. The developer had written something similar to the following to do this value conversion:

1
2
const amount: number = 8.95;
const paymentProcessorValue: number = amount * 100;

The problem ended up being caused by the way JavaScript does math. JavaScript uses floating-point arithmetic to do calculations. In this particular case, 8.95 * 100 was not returning the expected 895, but instead was returning 894.9999999999999. The payment processor truncated the value at the decimal point, therefore it interpreted this value as $8.94, not $8.95.

The issue was corrected by rounding the value before sending it on to the payment processor.

1
2
const amount: number = 8.95;
const paymentProcessorValue: number = Math.round(amount * 100);

Example

Saturday, May 20, 2017

How to install Java, SDKMAN!, Groovy, and Grails on the Windows Subsystem for Linux

This article explains how to install various development tools using the new Windows Subsystem for Linux that is available on Windows 10.

Install Windows Subsystem for Linux

In order to use the Windows Subsystem for Linux, it must be installed. The following link explains how to install this functionality in Windows 10:
https://msdn.microsoft.com/en-us/commandline/wsl/install_guide

Update Bash on Ubuntu on Windows 

Once installed, it is a good idea to update to the latest version of the Ubuntu binaries. Issuing the following commands from the Bash shell will accomplish this:

me@COMPUTER:~$ sudo apt-get update 
me@COMPUTER:~$ sudo apt-get upgrade 
Source: https://msdn.microsoft.com/en-us/commandline/wsl/faq#how-do-i-update-bash-on-ubuntu-on-windows

Install zip and unzip

Before you can install the Java JDK or any of the other tools, zip and unzip will need to be installed.

Install unzip

To install unzip:
me@COMPUTER:~sudo apt-get install unzip

To verify unzip was installed correctly:
me@COMPUTER:~unzip -v

Install zip

To install zip:
me@COMPUTER:~sudo apt-get install zip

To verify zip was installed correctly:
me@COMPUTER:~zip -v


Install the latest Java JDK

A nice shell script that can be used to install the Java JDK on the Windows Subsystem for Linux can be found on the following Stack Overflow article:
http://stackoverflow.com/questions/36478741/installing-oracle-jdk-on-windows-subsystem-for-linux#41072208

The URL for the latest version of the Java JDK can be found at: http://www.oracle.com/technetwork/java/javase/downloads/index.html

To verify which version of Java was installed:
me@COMPUTER:~$ java -version 


Install SDKMAN! 

SDKMAN! is a tool for managing parallel versions of multiple Software Development Kits on most Unix based systems. Instructions on how to install SDKMAN! can be found on the SDKMAN! website:
https://sdkman.io/install

Once SDKMAN! is installed, it can be used to install other tools, like Groovy or Grails.

Install Groovy

To install Groovy, issue the following command from the Bash shell:
me@COMPUTER:~sdk install groovy

Install Grails

To install Grails, issue the following command from the Bash shell:
me@COMPUTER:~sdk install grails

Once grails is installed, the steps outlined in the Grails documentation can be followed to create a “Hello World” application:
http://docs.grails.org/latest/guide/gettingStarted.html#creatingAnApplication

Note: I had to create the helloworld directory and navigate to it before I issued the create-app command:
me@COMPUTER:~mkdir helloworld
me@COMPUTER:~cd helloworld
me@COMPUTER:~/helloworldgrails create-app helloworld

Once I created my Grails application and the HelloController, I was able to start my application from either the Bash shell or the Windows Command Line using the following commands:

Bash Shell

me@COMPUTER:~/helloworld./gradlew bootRun
:compileJava NO-SOURCE
:compileGroovy
:buildProperties
:processResources
:classes
:findMainClass
:bootRun
Grails application running at http://localhost:8080 in environment: development

> Building 85% > :bootRun

Windows Command Line 

C:\...\helloworld>gradlew bootRun
:compileJava NO-SOURCE
:compileGroovy
:buildProperties
:processResources
:classes
:findMainClass
:bootRun
Grails application running at http://localhost:8080 in environment: development

> Building 85% > :bootRun


Friday, May 05, 2017

Inspect HTTP Requests with RequestBin

I came across this handy website for inspecting HTTP requests, called RequestBin (http://requestbin.net/ https://requestb.in/). RequestBin creates a URL that will collect requests made to it and lets you review the requests in a human-friendly way. RequestBin is a great tool for debugging what your HTTP application is sending. The following are some screenshots of the data RequestBin provides:


Friday, November 25, 2016

Arduino Joystick Library - Version 2.0

Introduction

Since I released the original Arduino Joystick Library (see http://mheironimus.blogspot.com/2015/11/arduino-joystick-library.html or http://www.instructables.com/id/Arduino-LeonardoMicro-as-Game-ControllerJoystick/ for more details) I have received numerous requests for enhancements. Most of these requests fall into the following two categories:

  • Increase the precision of the axes.
  • Make a version with only a specified set of features.
To accommodate these requests (and a few others) I have release Version 2.0 of the Arduino Joystick Library.

Out of the box the Arduino Leonardo and the Arduino Micro appear to the host computer as a generic keyboard and mouse. This article discusses how the Arduino Leonardo and the Arduino Micro can also appear as one or more generic Game Controllers or Joysticks. The Arduino Joystick Library Version 2.0 can be used with Arduino IDE 1.6.6 (or above) to add one or more joysticks (or gamepads) to the list of HID devices an Arduino Leonardo or Arduino Micro (or any Arduino clone that is based on the ATmega32u4) can support. This will not work with Arduino IDE 1.6.5 (or below) or with non-32u4 based Arduino devices (e.g. Arduino UNO, Arduino MEGA, etc.).

Features


The joystick or gamepad can have the following features:
  • Buttons (default: 32)
  • Up to 2 Hat Switches
  • X, Y, and/or Z Axis (up to 16-bit precision)
  • X, Y, and/or Z Axis Rotation (up to 16-bit precision)
  • Rudder (up to 16-bit precision)
  • Throttle (up to 16-bit precision)
  • Accelerator (up to 16-bit precision)
  • Brake (up to 16-bit precision)
  • Steering (up to 16-bit precision)
These features are configured using the Joystick_ class’s constructor.

Installation


The latest build of Version 2.0 of the Arduino Joystick Library can be downloaded from the following GitHub repository:
https://github.com/MHeironimus/ArduinoJoystickLibrary/tree/version-2.0

The library can also be downloaded directly using the following URL:
https://github.com/MHeironimus/ArduinoJoystickLibrary/archive/version-2.0.zip

Copy the Joystick folder to the Arduino Libraries folder (typically located at %userprofile%\Documents\Arduino\libraries on Microsoft Windows machines). On Microsoft Windows machines, only, this can be done by executing deploy.bat. The library should now appear in the Arduino IDE list of libraries.

Included Examples


The example Arduino sketch files listed below are included in this library. These will appear in the Arduino Example menu when the Arduino Joystick Library is installed.

Example Description
JoystickTest Simple test of the Joystick library. It exercises many of the Joystick library’s functions when pin A0 is grounded.
MultipleJoystickTest Creates 4 Joysticks using the library and exercises the first 16 buttons, the X axis, and the Y axis of each joystick when pin A0 is grounded.
JoystickButton Creates a Joystick and maps pin 9 to button 0 of the joystick, pin 10 to button 1, pin 11 to button 2, and pin 12 to button 3.
JoystickKeyboard Creates a Joystick and a Keyboard. Maps pin 9 to Joystick Button 0, pin 10 to Joystick Button 1, pin 11 to Keyboard key 1, and pin 12 to Keyboard key 2.
GamepadExample Creates a simple Gamepad with an Up, Down, Left, Right, and Fire button.
DrivingControllerTest Creates a Driving Controller and tests 4 buttons, the Steering, Brake, and Accelerator when pin A0 is grounded.
FlightControllerTest Creates a Flight Controller and tests 32 buttons, the X and Y axis, the Throttle, and the Rudder when pin A0 is grounded.
HatSwitchTest Creates a joystick with two hat switches. Grounding pins 4 - 11 cause the hat switches to change position.

Running the JoystickTest Example


The JoystickTest example sketch is included with the library. I recommend using this example to verify everything is working properly before beginning to write your own sketch files. Load, compile, and upload this example sketch file to an Arduino Leonardo or Micro using the Arduino IDE (version 1.6.6 or above).


Once you have uploaded the JoystickTest sketch file to the Arduino Leonardo or Micro, perform the following steps to verify everything is working properly. Note: the following steps are for Windows 10. If you have a different version of Windows or a different operating system, these steps may differ. Open the “Devices and Printers” window. This can be done by clicking the Start menu or pressing the Windows Key and typing “Devices and Printers”.

The Arduino Leonardo or Arduino Micro should appear in the list of devices.


Right mouse click on the Arduino Leonardo or Arduino Micro to display the settings menu.


Select “Game controller settings” to get to the “Game Controllers” dialog.


The Arduino Leonardo or Micro should appear in the list of installed game controllers. Select the Arduino Leonardo or Micro and click the Properties button to display the game controller test dialog.


While this dialog has focus, ground pin A0 on the Arduino to activate the test script. The test script will test the game controller functionality in the following order:
  • 32 buttons
  • throttle and rudder
  • X and Y Axis
  • Z Axis
  • 2 Hat Switches
  • X, Y, and Z Axis Rotation

Simple Gamepad Example


Once the Arduino Leonardo or Micro has been tested using the JoystickTest example, I suggest making a simple gamepad controller. This controller will have five buttons: up, down, left, right, and fire.

Connecting the Buttons


Connect one end of each button to the ground pin. Connect the other end of each button as indicated below:

Arduino Pin Description
2
Up
3
Right
4
Down
5
Left
6
Fire

Sketch File


Upload the GamepadExample example sketch file to the Arduino Leonardo or Micro. This example is included with the Arduino Joystick Library.


Test


Open the game controller properties or use the joystick testing application of your choice to test the behavior of your gamepad.


Joystick Library API


The complete documentation for the Arduino Joystick Library can be found at https://github.com/MHeironimus/ArduinoJoystickLibrary/tree/version-2.0.


Tuesday, August 16, 2016

Set Color of HTML INPUT's Placeholder Text

All INPUT Elements

It is possible to set the text color of an HTML INPUT element's placeholder text using the following browser-specific css:

 1
 2
 3
 4
 5
 6
 7
 8
 9
10
11
12
13
14
15
16
17
18
/* WebKit, Blink, Microsoft Edge, Google Chrome */
::-webkit-input-placeholder { 
    color:    red;
}
/* Mozilla Firefox 4 to 18 */
:-moz-placeholder { 
    color:    red;
    opacity:  1;
}
/* Mozilla Firefox 19+ */
::-moz-placeholder { 
    color:    red;
    opacity:  1;
}
/* Micosoft Internet Explorer 10+ */
:-ms-input-placeholder { 
  color:    red;
}      

Specific INPUT Elements

If you want to change the placeholder text color of just a single element, you can add the appropriate CSS selector to the beginning of each CSS vendor prefix. For example, if you want to only change the placeholder text color of the INPUT element with an id of greenPlaceholder, you would use the following css:

 1
 2
 3
 4
 5
 6
 7
 8
 9
10
11
12
13
14
15
16
17
18
/* WebKit, Blink, Microsoft Edge, Google Chrome */
#greenPlaceholder::-webkit-input-placeholder { 
    color:    green;
}
/* Mozilla Firefox 4 to 18 */
#greenPlaceholder:-moz-placeholder { 
    color:    green;
    opacity:  1;
}
/* Mozilla Firefox 19+ */
#greenPlaceholder::-moz-placeholder { 
    color:    green;
    opacity:  1;
}
/* Micosoft Internet Explorer 10+ */
#greenPlaceholder:-ms-input-placeholder { 
  color:    green;
}      

Notes

  • If you do not specify the opacity setting on the Firefox browser, the text color will be lighter than the color you specify (e.g. red looks more like pink).
  • Do not combine all of the CSS statements into one statement (e.g. ::-webkit-input-placeholder, :-moz-placeholder, ::-moz-placeholder, :-ms-input-placeholder {color: red;}). If a browser does not recognize a selector, it invalidates the entire line of selectors.

Example

 1
 2
 3
 4
 5
 6
 7
 8
 9
10
11
12
13
14
15
16
17
18
19
20
21
22
23
24
25
26
27
28
29
30
31
32
33
34
35
36
37
38
39
40
41
42
43
44
45
46
47
48
49
50
51
52
53
54
55
56
57
58
59
60
61
62
63
64
65
66
67
68
69
70
71
72
73
74
75
76
77
78
<!doctype html>

<html lang="en">
<head>
  <meta charset="utf-8">

  <title>INPUT Placehold Text Example</title>
  <meta name="description" content="An example page showing how to set the HTML INPUT element's placeholder text color.'">
  <meta name="author" content="Matthew Heironimus">

  <style>
      body {
          font-family: Verdana, Arial, Sans-serif;
          font-size: 14pt;
      }
      label {
          display: inline-block;
          width: 250px;
      }
      input {
          font-size: 14pt;
      }
      div {
          margin-bottom: 6px;
      }

      /* WebKit, Blink, Microsoft Edge, Google Chrome */
      ::-webkit-input-placeholder { 
          color:    red;
      }
      /* Mozilla Firefox 4 to 18 */
      :-moz-placeholder { 
          color:    red;
          opacity:  1;
      }
      /* Mozilla Firefox 19+ */
      ::-moz-placeholder { 
          color:    red;
          opacity:  1;
      }
      /* Micosoft Internet Explorer 10+ */
      :-ms-input-placeholder { 
        color:    red;
      }      

      /* WebKit, Blink, Microsoft Edge, Google Chrome */
      #greenPlaceholder::-webkit-input-placeholder { 
          color:    green;
      }
      /* Mozilla Firefox 4 to 18 */
      #greenPlaceholder:-moz-placeholder { 
          color:    green;
          opacity:  1;
      }
      /* Mozilla Firefox 19+ */
      #greenPlaceholder::-moz-placeholder { 
          color:    green;
          opacity:  1;
      }
      /* Micosoft Internet Explorer 10+ */
      #greenPlaceholder:-ms-input-placeholder { 
        color:    green;
      }      

  </style>

</head>
    <body>
        <div>
            <label for="redPlaceholder">Red Placeholder Text:</label>
            <input id="redPlaceholder" type="text" placeholder="This should be red" />
        </div>
        <div>
            <label for="greenPlaceholder">Green Placeholder Text:</label>
            <input id="greenPlaceholder" type="text" placeholder="This should be green" />
        </div>
    </body>
</html>

Tuesday, May 03, 2016

Node.js Hosting – Windows vs. Linux – Case Sensitivity

The Problem

I recently worked on a Node.js project were we were doing our development on Windows 7 machines, but the actual hosting was being done with Cloud Foundry (running Linux). This website contained a number of graphical images, which appeared correctly on our Windows 7 development machines, but when we deployed our application to Cloud Foundry, a number of the images would not appear. The cause for this discrepancy between environments was Linux is a case sensitive operating system, but Windows is not case sensitive.

The Quick Solution

To resolve this issue we went through our code and verify the case of the filenames matched any references to those files in our source code.

Preventing the Issue

We wanted to prevent an issue like this from happening again, so we decided to institute a naming convention for all of our image files. In our case we decided to make them all lower case. To enforce this convention we used the gulp-check-file-naming-convention (see https://github.com/HAKASHUN/gulp-check-file-naming-convention for more details) gulp plugin by HAKASHUN.

The following is a simple gulp example showing how this plugin can be used:

1
2
3
4
5
6
7
const gulp = require('gulp');
const fileNamingConventionChecker = require("gulp-check-file-naming-convention");

gulp.task('default', function() {
    gulp.src("./public/**/*")
        .pipe(fileNamingConventionChecker({ caseName: 'lowerCase' }));
});

The error message that is generated by this gulp plugin will look something like the following:

[08:27:59] Using gulpfile ~\Source\git\app\gulpfile.js
[08:27:59] Starting 'default'...
[08:27:59] Finished 'default' after 11 ms

events.js:160
      throw er; // Unhandled 'error' event
      ^
 Error: Invalid file name at ←[31mC:\Users\NAME\Source\git\app\public
\img\SquareProfile.jpg←[39m :
 > ←[32msquareprofile.jpg←[39m is valid.