Saturday, April 25, 2015

Add Up To 3 USB Game Controllers to Arduino Leonardo or Micro

IMPORTANT NOTE: This article is for Arduino IDE version 1.6.5 (or below). To add a USB Game Controller to an Arduino Leonardo or Micro using Arduino IDE version 1.6.6 (or above) see the Arduino Joystick Library post.

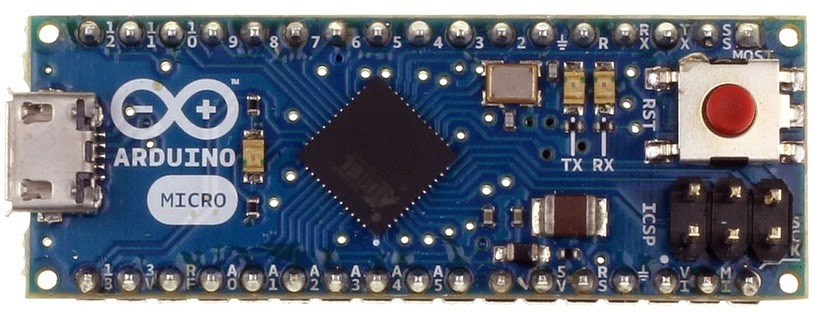
This is a follow-up to the article I posted last month, called Add USB Game Controller to Arduino Leonardo or Micro.Out of the box the Arduino Leonardo and the Arduino Micro appear to the host computer as a generic keyboard and mouse. This article discusses how the Arduino Leonardo and the Arduino Micro can also appear as two or three generic Game Controllers. This project will only work with Arduino products based on the ATmega32u4 microcontroller (i.e. the Arduino Leonardo and the Arduino Micro). It will not work with the Arduino Uno, because it is based on the ATmega328 microcontroller.


For this project the USB game controllers provided by the Arduino Leonardo or Micro only provide the following:

  • X and Y Axis
  • 16 Buttons

If more complex USB game controllers are desired, refer to the USBAPI.h and HID.cpp files in the Add USB Game Controller to Arduino Leonardo or Micro article.

Updating the Arduino Code

First make a backup copy of the following two files in the “%PROGRAMFILES%\Arduino\hardware\arduino\avr\cores\arduino” folder:

  • USBAPI.h
  • HID.cpp

Two Game Controllers

Replace these two files with the following to add a two generic Game Controllers to the Arduino Leonardo and the Arduino Micro:

Three Game Controllers

Replace these two files with the following to add a three generic Game Controllers to the Arduino Leonardo and the Arduino Micro:

Running the Test Sketch

Compile and upload either the UsbDualJoystickTest.ino (https://static.heironimus.info/blog/dual-game-controller/UsbDualJoystickTest.ino) or UsbTriJoystickTest.ino (https://static.heironimus.info/blog/tri-game-controller/UsbTriJoystickTest.ino) sketch file onto the Arduino Leonardo or the Arduino Micro using the Arduino Software (IDE). I have tested this using version 1.6.1 through 1.6.5 of the software.

NOTE (added 11/19/2015): Due to a change in how the USB functionality is implemented in version 1.6.6 and above, please see Arduino Joystick Library if you are using Arduino IDE version 1.6.6 and above.

The following steps are for Windows 7. If you have a different version of Windows or a different operating system, these steps may differ.

Go to the Windows Control Panel and select “Hardware and Sound”.


Then select “Devices and Printers”.


The Arduino Micro or Arduino Leonardo should appear in the list of devices.


Next right mouse click on the Arduino Leonardo or Arduino Micro to display the settings menu.


Select “Game controller settings” to get to the “Game Controllers” dialog.

[if the Two Game Controller files were used]


[if the Three Game Controller files were used]

Either two or three Arduino Micros or Arduino Leonardos should appear in the list of installed game controllers. Select the first Arduino Micro or Arduino Leonardo and click the Properties button to display the game controller test dialog.


While this dialog has focus, ground pin A0 on the Arduino to activate the test script. The test script will test the game controller functionality in the following order:
  • 16 Buttons
  • X and Y Axis

After testing the first game controller, the test script will perform the same test on the second game controller. Click the second Arduino Micro or Arduino Leonardo and click the Properties button to display the game controller test dialog and observe the test running against the second game controller. If the three game controller version of the files were used, the third game controller will be tested after the second.

Joystick Library

Now that the Arduino Leonardo or Arduino Micro has the Joystick library, the Arduino can be used for custom game controller projects. The following describes the Joystick library that is included in the updated USBAPI.h and HID.cpp files. The joystickIndex is 0-based (i.e. the first game controller has a joystickIndex of 0, the second has a joystickIndex of 1, and the third has a joystickIndex of 2).

Joystick[joystickIndex].begin(bool initAutoSendState)

Starts emulating a game controller connected to a computer. By default all methods update the game controller state immediately. If initAutoSendState is set to false, the Joystick[joystickIndex].sendState method must be called to update the game controller state.

Joystick[joystickIndex].end()

Stops the game controller emulation to a connected computer.

Joystick[joystickIndex].setXAxis(byte value)

Sets the X axis value. Range -127 to 127 (0 is center).

Joystick[joystickIndex].setYAxis(byte value)

Sets the Y axis value. Range -127 to 127 (0 is center).

Joystick[joystickIndex].setButton(byte button, byte value)

Sets the state of the specified button. The button is the 0-based button number (i.e. button #1 is 0, button #2 is 1, etc.). The value is 1 if the button is pressed and 0 if the button is released.

Joystick[joystickIndex].pressButton(byte button)

Press the indicated button. The button is the 0-based button number (i.e. button #1 is 0, button #2 is 1, etc.).

Joystick[joystickIndex].releaseButton(byte button)

Release the indicated button. The button is the 0-based button number (i.e. button #1 is 0, button #2 is 1, etc.).

Joystick[joystickIndex].sendState()

Sends the updated joystick state to the host computer. Only needs to be called if AutoSendState is false (see Joystick[joystickIndex].begin for more details).

Saturday, March 28, 2015

Add USB Game Controller to Arduino Leonardo or Micro

IMPORTANT NOTE: This article is for Arduino IDE version 1.6.5 (or below). To add a USB Game Controller to an Arduino Leonardo or Micro using Arduino IDE version 1.6.6 (or above) see the Arduino Joystick Library post.

Introduction

Out of the box the Arduino Leonardo and the Arduino Micro appear to the host computer as a generic keyboard and mouse. This article discusses how the Arduino Leonardo and the Arduino Micro can also appear as a generic Game Controller. This project will only work with Arduino products based on the ATmega32u4 microcontroller (i.e. the Arduino Leonardo and the Arduino Micro). It will not work with the Arduino Uno, because it is based on the ATmega328 microcontroller.


The Arduino generic Game Controller provides the following:

  • X, Y, and Z axis
  • 32 buttons
  • X, Y, and Z axis rotation
  • Rudder
  • Throttle
  • 2 Point of View Hat Switches

Updating the Arduino Code

First make a backup copy of the following two files in the “%PROGRAMFILES%\Arduino\hardware\arduino\avr\cores\arduino” folder:

  • USBAPI.h
  • HID.cpp

Replace these two files with the following to add a generic Game Controller to the Arduino Leonardo and the Arduino Micro:

Running the Test Sketch

Compile and upload the UsbJoystickTest.ino sketch file onto the Arduino Leonardo or the Arduino Micro using the Arduino Software (IDE). I have tested this using version 1.6.1 through 1.6.5 of the software.

NOTE (added 11/19/2015): Due to a change in how the USB functionality is implemented in version 1.6.6 and above, please see Arduino Joystick Library if you are using Arduino IDE version 1.6.6 and above.

The following steps are for Windows 7. If you have a different version of Windows or a different operating system, these steps may differ.

Go to the Windows Control Panel and select “Hardware and Sound”.


Then select “Devices and Printers”.

 
The Arduino Micro or Arduino Leonardo should appear in the list of devices.


Next right mouse click on the Arduino Leonardo or Arduino Micro to display the settings menu.

 
Select “Game controller settings” to get to the “Game Controllers” dialog.


The Arduino Micro or Arduino Leonardo should appear in the list of installed game controllers. Select the Arduino Micro or Arduino Leonardo and click the Properties button to display the game controller test dialog.

While this dialog has focus, ground pin A0 on the Arduino to activate the test script. The test script will test the game controller functionality in the following order:

  • 32 buttons
  • throttle and rudder
  • X and Y Axis
  • Z Axis
  • 2 Hat Switches
  • X and Y Axis Rotation

Joystick Library

Now that the Arduino Leonardo or Arduino Micro has the Joystick library, the Arduino can be used for custom game controller projects. The following describes the Joystick library that is included in the updated USBAPI.h and HID.cpp files.

Joystick.begin(bool initAutoSendState)

Starts emulating a game controller connected to a computer. By default all methods update the game controller state immediately. If initAutoSendState is set to false, the Joystick.sendState method must be called to update the game controller state.

Joystick.end()

Stops the game controller emulation to a connected computer.

Joystick.setXAxis(byte value)

Sets the X axis value. Range -127 to 127 (0 is center).

Joystick.setYAxis(byte value)

Sets the Y axis value. Range -127 to 127 (0 is center).

Joystick.setZAxis(byte value)

Sets the Z axis value. Range -127 to 127 (0 is center).

Joystick.setXAxisRotation(int value)

Sets the X axis rotation value. Range 0° to 360°.

Joystick.setyAxisRotation(int value)

Sets the Y axis rotation value. Range 0° to 360°.

Joystick.setZAxisRotation(int value)

Sets the Z axis rotation value. Range 0° to 360°.

Joystick.setButton(byte button, byte value)

Sets the state of the specified button. The button is the 0-based button number (i.e. button #1 is 0, button #2 is 1, etc.). The value is 1 if the button is pressed and 0 if the button is released.

Joystick.pressButton(byte button)

Press the indicated button. The button is the 0-based button number (i.e. button #1 is 0, button #2 is 1, etc.).

Joystick.releaseButton(byte button)

Release the indicated button. The button is the 0-based button number (i.e. button #1 is 0, button #2 is 1, etc.).

Joystick.setThrottle(byte value)

Sets the throttle value. Range 0 to 255.

Joystick.setRudder(byte value)

Sets the rudder value. Range 0 to 255.

Joystick.setHatSwitch(byte hatSwitch, int value)

Sets the value of the specified hat switch. The hatSwitch is 0-based (i.e. hat switch #1 is 0 and hat switch #2 is 1). The value is from 0° to 360°, but in 45° increments. Any value less than 45° will be rounded down (i.e. 44° is rounded down to 0°, 89° is rounded down to 45°, etc.).

Joystick.sendState()

Sends the updated joystick state to the host computer. Only needs to be called if AutoSendState is false (see Joystick.begin for more details).

Saturday, February 28, 2015

jsonFormatter – jQuery Plugin

I recently needed to display some JSON on a webpage, but the JSON being displaying was hard to ready due to its length and lack of formatting. I searched the web and found a nice little JavaScript routine written by Vladimir Bodurov (http://bodurov.com/JsonFormatter/).

I took his script, made a few modifications, converted it into a jQuery Plugin, and published it to GitHub (https://github.com/MHeironimus/jsonFormatter). To use this plugin include jsonFormatter.min.css and jsonFormatter.min.js in your html file. See the jsonFormatterExample.html file for an example on how to do this. If you wish to use the darkTheme, include the jsonFormatter-darkTheme.min.css file.

An example webpage that uses the jsonFormatter jQuery Plugin can be viewed at https://static.heironimus.info/blog/jsonformatter/example/jsonFormatterExample.html.

Example

Before

Before


After

HTML

<html>

<head>

    <title>jsonFormatter Example</title>

    <link href="../source/jsonFormatter.min.css" rel="stylesheet" />

</head>

<body>

    <div class="content">

        <h1>jsonFormatter Example</h1>

        <section>

            <h2>Default Theme, Default Options Example</h2>

            <div class="exampleJavaScript">$('.jsonFormatter').jsonFormatter();</div>

            <div class="exampleJson jsonFormatter">{stringValue:"string value",numberValue:-4.506,booleanValue:true,arrayOfStrings:['one','two','three'],arrayOfObjects:[{firstProperty:1,secondProperty:2},{firstProperty:3,secondProperty:4}],undefinedProperty:undefined,emptyProperty:{}}</div>

        </section>


    <script src="http://ajax.aspnetcdn.com/ajax/jQuery/jquery-1.11.2.min.js" type="text/javascript"></script>

    <script src="../source/jsonFormatter.min.js" type="text/javascript"></script>

    <script type="text/javascript">

        $(document).ready(function () {

            $('.jsonFormatter').jsonFormatter();

        });

    </script>

</body>

</html>

Documentation

.jsonFormatter(options)

Returns: jQuery

Description: If the matched elements contain JSON, they are formatted to be easier to read. Arrays and object are optionally collapsible.

Options

quoteKeys

Type: Boolean
Default: true

Specifies if object’s keys should be quoted in the formatted output.

collapsible

Type: Boolean
Default: true

Specifies if arrays and objects are collapsible in the formatted output.

hideOriginal

Type: Boolean
Default: true

Specifies if the original element is hidden. The element will only be hidden if it contains valid JSON that was successfully formatted.