Saturday, March 28, 2015

Add USB Game Controller to Arduino Leonardo or Micro

IMPORTANT NOTE: This article is for Arduino IDE version 1.6.5 (or below). To add a USB Game Controller to an Arduino Leonardo or Micro using Arduino IDE version 1.6.6 (or above) see the Arduino Joystick Library post.

Introduction

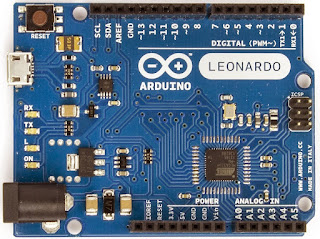
Out of the box the Arduino Leonardo and the Arduino Micro appear to the host computer as a generic keyboard and mouse. This article discusses how the Arduino Leonardo and the Arduino Micro can also appear as a generic Game Controller. This project will only work with Arduino products based on the ATmega32u4 microcontroller (i.e. the Arduino Leonardo and the Arduino Micro). It will not work with the Arduino Uno, because it is based on the ATmega328 microcontroller.


The Arduino generic Game Controller provides the following:

  • X, Y, and Z axis
  • 32 buttons
  • X, Y, and Z axis rotation
  • Rudder
  • Throttle
  • 2 Point of View Hat Switches

Updating the Arduino Code

First make a backup copy of the following two files in the “%PROGRAMFILES%\Arduino\hardware\arduino\avr\cores\arduino” folder:

  • USBAPI.h
  • HID.cpp

Replace these two files with the following to add a generic Game Controller to the Arduino Leonardo and the Arduino Micro:

Running the Test Sketch

Compile and upload the UsbJoystickTest.ino sketch file onto the Arduino Leonardo or the Arduino Micro using the Arduino Software (IDE). I have tested this using version 1.6.1 through 1.6.5 of the software.

NOTE (added 11/19/2015): Due to a change in how the USB functionality is implemented in version 1.6.6 and above, please see Arduino Joystick Library if you are using Arduino IDE version 1.6.6 and above.

The following steps are for Windows 7. If you have a different version of Windows or a different operating system, these steps may differ.

Go to the Windows Control Panel and select “Hardware and Sound”.


Then select “Devices and Printers”.

 
The Arduino Micro or Arduino Leonardo should appear in the list of devices.


Next right mouse click on the Arduino Leonardo or Arduino Micro to display the settings menu.

 
Select “Game controller settings” to get to the “Game Controllers” dialog.


The Arduino Micro or Arduino Leonardo should appear in the list of installed game controllers. Select the Arduino Micro or Arduino Leonardo and click the Properties button to display the game controller test dialog.

While this dialog has focus, ground pin A0 on the Arduino to activate the test script. The test script will test the game controller functionality in the following order:

  • 32 buttons
  • throttle and rudder
  • X and Y Axis
  • Z Axis
  • 2 Hat Switches
  • X and Y Axis Rotation

Joystick Library

Now that the Arduino Leonardo or Arduino Micro has the Joystick library, the Arduino can be used for custom game controller projects. The following describes the Joystick library that is included in the updated USBAPI.h and HID.cpp files.

Joystick.begin(bool initAutoSendState)

Starts emulating a game controller connected to a computer. By default all methods update the game controller state immediately. If initAutoSendState is set to false, the Joystick.sendState method must be called to update the game controller state.

Joystick.end()

Stops the game controller emulation to a connected computer.

Joystick.setXAxis(byte value)

Sets the X axis value. Range -127 to 127 (0 is center).

Joystick.setYAxis(byte value)

Sets the Y axis value. Range -127 to 127 (0 is center).

Joystick.setZAxis(byte value)

Sets the Z axis value. Range -127 to 127 (0 is center).

Joystick.setXAxisRotation(int value)

Sets the X axis rotation value. Range 0° to 360°.

Joystick.setyAxisRotation(int value)

Sets the Y axis rotation value. Range 0° to 360°.

Joystick.setZAxisRotation(int value)

Sets the Z axis rotation value. Range 0° to 360°.

Joystick.setButton(byte button, byte value)

Sets the state of the specified button. The button is the 0-based button number (i.e. button #1 is 0, button #2 is 1, etc.). The value is 1 if the button is pressed and 0 if the button is released.

Joystick.pressButton(byte button)

Press the indicated button. The button is the 0-based button number (i.e. button #1 is 0, button #2 is 1, etc.).

Joystick.releaseButton(byte button)

Release the indicated button. The button is the 0-based button number (i.e. button #1 is 0, button #2 is 1, etc.).

Joystick.setThrottle(byte value)

Sets the throttle value. Range 0 to 255.

Joystick.setRudder(byte value)

Sets the rudder value. Range 0 to 255.

Joystick.setHatSwitch(byte hatSwitch, int value)

Sets the value of the specified hat switch. The hatSwitch is 0-based (i.e. hat switch #1 is 0 and hat switch #2 is 1). The value is from 0° to 360°, but in 45° increments. Any value less than 45° will be rounded down (i.e. 44° is rounded down to 0°, 89° is rounded down to 45°, etc.).

Joystick.sendState()

Sends the updated joystick state to the host computer. Only needs to be called if AutoSendState is false (see Joystick.begin for more details).
Saturday, February 28, 2015

jsonFormatter – jQuery Plugin

I recently needed to display some JSON on a webpage, but the JSON being displaying was hard to ready due to its length and lack of formatting. I searched the web and found a nice little JavaScript routine written by Vladimir Bodurov (http://bodurov.com/JsonFormatter/).

I took his script, made a few modifications, converted it into a jQuery Plugin, and published it to GitHub (https://github.com/MHeironimus/jsonFormatter). To use this plugin include jsonFormatter.min.css and jsonFormatter.min.js in your html file. See the jsonFormatterExample.html file for an example on how to do this. If you wish to use the darkTheme, include the jsonFormatter-darkTheme.min.css file.

An example webpage that uses the jsonFormatter jQuery Plugin can be viewed at https://static.heironimus.info/blog/jsonformatter/example/jsonFormatterExample.html.

Example

Before

Before


After

HTML

<html>

<head>

    <title>jsonFormatter Example</title>

    <link href="../source/jsonFormatter.min.css" rel="stylesheet" />

</head>

<body>

    <div class="content">

        <h1>jsonFormatter Example</h1>

        <section>

            <h2>Default Theme, Default Options Example</h2>

            <div class="exampleJavaScript">$('.jsonFormatter').jsonFormatter();</div>

            <div class="exampleJson jsonFormatter">{stringValue:"string value",numberValue:-4.506,booleanValue:true,arrayOfStrings:['one','two','three'],arrayOfObjects:[{firstProperty:1,secondProperty:2},{firstProperty:3,secondProperty:4}],undefinedProperty:undefined,emptyProperty:{}}</div>

        </section>


    <script src="http://ajax.aspnetcdn.com/ajax/jQuery/jquery-1.11.2.min.js" type="text/javascript"></script>

    <script src="../source/jsonFormatter.min.js" type="text/javascript"></script>

    <script type="text/javascript">

        $(document).ready(function () {

            $('.jsonFormatter').jsonFormatter();

        });

    </script>

</body>

</html>

Documentation

.jsonFormatter(options)

Returns: jQuery

Description: If the matched elements contain JSON, they are formatted to be easier to read. Arrays and object are optionally collapsible.

Options

quoteKeys

Type: Boolean
Default: true

Specifies if object’s keys should be quoted in the formatted output.

collapsible

Type: Boolean
Default: true

Specifies if arrays and objects are collapsible in the formatted output.

hideOriginal

Type: Boolean
Default: true

Specifies if the original element is hidden. The element will only be hidden if it contains valid JSON that was successfully formatted.

Tuesday, January 27, 2015

Solving Scramble Squares Puzzles

A couple of years ago my kids got a Scramble Squares puzzle (https://scramblesquares.com/) from their grandmother. A Scramble Squares puzzle contains nine squares puzzle pieces. The edge of each piece has half an image on it (e.g. the head of a zebra, the tail of an elephant, etc.). The puzzle pieces must be arranged in a 3 x 3 grid so that the images on the edges line up correctly (e.g. the head of the zebra is against the tail of the zebra). The actual puzzle my kids received was the Serengeti puzzle - https://scramblesquares.com/product/serengeti-scramble-squares/). After spending a couple of hours trying to solve the puzzle, I decided to write a computer program that would do it for me.

XML Puzzle File

First I defined an XML representation of each puzzle piece:

<PuzzlePiece>

  <Name>A</Name>

  <North>

    <Image>Zebra</Image>

    <Half>Bottom</Half>

  </North>

  <South>

    <Image>Giraffe</Image>

    <Half>Bottom</Half>

  </South>

  <East>

    <Image>Rhinoceros</Image>

    <Half>Top</Half>

  </East>

  <West>

    <Image>Elephant</Image>

    <Half>Bottom</Half>

  </West>

  <CenterImageDirection>NorthEast</CenterImageDirection>

</PuzzlePiece>

Each piece could be given a unique name, designated by the Name element. Each piece had a North, South, East, and West side defined. Each side consisted of two elements: Image and Half. Image indicated what picture was on the edge and Half indicated if it was the Top half or the Bottom half of the image. Each puzzle piece also has an image in the center. I was not sure if this image had anything to do with the solution to the puzzle or not, so I included an element to indicate which direction this image was rotated. As it turned out, this image is not significant, so this is not really necessary.

Next I defined an XML representation of the entire puzzle:

<ScrambleSquaresPuzzleFile>

  <NumberOfRows>3</NumberOfRows>

  <NumberOfColumns>3</NumberOfColumns>

  <PuzzlePieces>

    <PuzzlePiece>…</PuzzlePiece>

    <PuzzlePiece>…</PuzzlePiece>

    <PuzzlePiece>…</PuzzlePiece>

    <PuzzlePiece>…</PuzzlePiece>

    <PuzzlePiece>…</PuzzlePiece>

    <PuzzlePiece>…</PuzzlePiece>

    <PuzzlePiece>…</PuzzlePiece>

    <PuzzlePiece>…</PuzzlePiece>

    <PuzzlePiece>…</PuzzlePiece>

</ScrambleSquaresPuzzleFile>

The puzzle contains three elements. The first, NumberOfRows, indicates how many rows of pieces should be in the solution. The second, NumberOfColumns, indicates how many columns of pieces should be in the solution. The last, PuzzlePieces, contains the list of puzzle pieces that make up the puzzle.

Brute Force Algorithm

My first attempt to solve the puzzle was to use a brute force algorithm that would try every possible permutation. There are nine pieces in the puzzle and each piece can be rotated in four different directions. The following formula can be used to determine how many possible solutions must be tried:

(# of sides)^(number of pieces) * (number of pieces)!

4^9 * 9! = 262,144 * 362,880 = 95,126,814,720

It turns out that 95 billion possible solutions is a lot, even for today’s fast computers. On my HP Pavilion HPE with a 3.4 GHz Intel Core i7-2600 processor, it took over 26 hours to solve the puzzle. It found four solutions (basically one solution rotated four different directions). I was happy to know the solution to the puzzle, but I was determined to reduce the time it took to solve the puzzle. No one wants to wait a full day to find the solution to a puzzle.

Multi-Threaded Brute Force Algorithms

Because the original algorithm was single threaded, it was only using a small portion of the available CPU power. My next set of solutions used various multi-threading techniques to break the work up into parts that could be done in parallel. In one I used the .NET Parallel.ForEach function (https://learn.microsoft.com/en-us/dotnet/api/system.threading.tasks.parallel.foreach) to break up the work. In another I used .NET Tasks (https://learn.microsoft.com/en-us/dotnet/api/system.threading.tasks.task). I also tried .NET Threads (https://learn.microsoft.com/en-us/dotnet/api/system.threading.thread). All of these solutions still tried all of the 95,126,814,720 possible solutions, but did so using most of the available CPU power. These algorithms got the solving time down below 10 hours, but that was still a long time to wait to solve the puzzle.

Edge Solve Algorithm

The final algorithm I attempted first determined for each side of each piece which other puzzle piece edges would match. Then it would only attempt to build the solution to the puzzle using known matching edges. This significantly reduced the number of possible solutions that needed to be tested. In the case of the Serengeti puzzle, only 10,699 solutions had to be attempted, rather than 95,126,814,720. The program could now solve the puzzle in under a second.

Scramble Squares Puzzles

I have used this program to find the solution to the following four Scramble Squares puzzles:

Unlike the other three puzzles, the Butterflies puzzle actually has eight solutions (two solutions rotated four ways).

Scramble Squares Solver Program

You can download my Scramble Squares Solver program at https://static.heironimus.info/instructables/scramble-squares/ScrambleSquaresSolver.zip. You can download the source code and unit tests for the program at https://static.heironimus.info/instructables/scramble-squares/ScrambleSquaresSolverSource.zip. You can go to https://scramblesquares.com/ to purchase your own Scramble Squares puzzles.