Tuesday, August 16, 2016

Set Color of HTML INPUT's Placeholder Text

All INPUT Elements

It is possible to set the text color of an HTML INPUT element's placeholder text using the following browser-specific css:

 1
 2
 3
 4
 5
 6
 7
 8
 9
10
11
12
13
14
15
16
17
18
/* WebKit, Blink, Microsoft Edge, Google Chrome */
::-webkit-input-placeholder { 
    color:    red;
}
/* Mozilla Firefox 4 to 18 */
:-moz-placeholder { 
    color:    red;
    opacity:  1;
}
/* Mozilla Firefox 19+ */
::-moz-placeholder { 
    color:    red;
    opacity:  1;
}
/* Micosoft Internet Explorer 10+ */
:-ms-input-placeholder { 
  color:    red;
}      

Specific INPUT Elements

If you want to change the placeholder text color of just a single element, you can add the appropriate CSS selector to the beginning of each CSS vendor prefix. For example, if you want to only change the placeholder text color of the INPUT element with an id of greenPlaceholder, you would use the following css:

 1
 2
 3
 4
 5
 6
 7
 8
 9
10
11
12
13
14
15
16
17
18
/* WebKit, Blink, Microsoft Edge, Google Chrome */
#greenPlaceholder::-webkit-input-placeholder { 
    color:    green;
}
/* Mozilla Firefox 4 to 18 */
#greenPlaceholder:-moz-placeholder { 
    color:    green;
    opacity:  1;
}
/* Mozilla Firefox 19+ */
#greenPlaceholder::-moz-placeholder { 
    color:    green;
    opacity:  1;
}
/* Micosoft Internet Explorer 10+ */
#greenPlaceholder:-ms-input-placeholder { 
  color:    green;
}      

Notes

  • If you do not specify the opacity setting on the Firefox browser, the text color will be lighter than the color you specify (e.g. red looks more like pink).
  • Do not combine all of the CSS statements into one statement (e.g. ::-webkit-input-placeholder, :-moz-placeholder, ::-moz-placeholder, :-ms-input-placeholder {color: red;}). If a browser does not recognize a selector, it invalidates the entire line of selectors.

Example

 1
 2
 3
 4
 5
 6
 7
 8
 9
10
11
12
13
14
15
16
17
18
19
20
21
22
23
24
25
26
27
28
29
30
31
32
33
34
35
36
37
38
39
40
41
42
43
44
45
46
47
48
49
50
51
52
53
54
55
56
57
58
59
60
61
62
63
64
65
66
67
68
69
70
71
72
73
74
75
76
77
78
<!doctype html>

<html lang="en">
<head>
  <meta charset="utf-8">

  <title>INPUT Placehold Text Example</title>
  <meta name="description" content="An example page showing how to set the HTML INPUT element's placeholder text color.'">
  <meta name="author" content="Matthew Heironimus">

  <style>
      body {
          font-family: Verdana, Arial, Sans-serif;
          font-size: 14pt;
      }
      label {
          display: inline-block;
          width: 250px;
      }
      input {
          font-size: 14pt;
      }
      div {
          margin-bottom: 6px;
      }

      /* WebKit, Blink, Microsoft Edge, Google Chrome */
      ::-webkit-input-placeholder { 
          color:    red;
      }
      /* Mozilla Firefox 4 to 18 */
      :-moz-placeholder { 
          color:    red;
          opacity:  1;
      }
      /* Mozilla Firefox 19+ */
      ::-moz-placeholder { 
          color:    red;
          opacity:  1;
      }
      /* Micosoft Internet Explorer 10+ */
      :-ms-input-placeholder { 
        color:    red;
      }      

      /* WebKit, Blink, Microsoft Edge, Google Chrome */
      #greenPlaceholder::-webkit-input-placeholder { 
          color:    green;
      }
      /* Mozilla Firefox 4 to 18 */
      #greenPlaceholder:-moz-placeholder { 
          color:    green;
          opacity:  1;
      }
      /* Mozilla Firefox 19+ */
      #greenPlaceholder::-moz-placeholder { 
          color:    green;
          opacity:  1;
      }
      /* Micosoft Internet Explorer 10+ */
      #greenPlaceholder:-ms-input-placeholder { 
        color:    green;
      }      

  </style>

</head>
    <body>
        <div>
            <label for="redPlaceholder">Red Placeholder Text:</label>
            <input id="redPlaceholder" type="text" placeholder="This should be red" />
        </div>
        <div>
            <label for="greenPlaceholder">Green Placeholder Text:</label>
            <input id="greenPlaceholder" type="text" placeholder="This should be green" />
        </div>
    </body>
</html>

Tuesday, May 03, 2016

Node.js Hosting – Windows vs. Linux – Case Sensitivity

The Problem

I recently worked on a Node.js project were we were doing our development on Windows 7 machines, but the actual hosting was being done with Cloud Foundry (running Linux). This website contained a number of graphical images, which appeared correctly on our Windows 7 development machines, but when we deployed our application to Cloud Foundry, a number of the images would not appear. The cause for this discrepancy between environments was Linux is a case sensitive operating system, but Windows is not case sensitive.

The Quick Solution

To resolve this issue we went through our code and verify the case of the filenames matched any references to those files in our source code.

Preventing the Issue

We wanted to prevent an issue like this from happening again, so we decided to institute a naming convention for all of our image files. In our case we decided to make them all lower case. To enforce this convention we used the gulp-check-file-naming-convention (see https://github.com/HAKASHUN/gulp-check-file-naming-convention for more details) gulp plugin by HAKASHUN.

The following is a simple gulp example showing how this plugin can be used:

1
2
3
4
5
6
7
const gulp = require('gulp');
const fileNamingConventionChecker = require("gulp-check-file-naming-convention");

gulp.task('default', function() {
    gulp.src("./public/**/*")
        .pipe(fileNamingConventionChecker({ caseName: 'lowerCase' }));
});

The error message that is generated by this gulp plugin will look something like the following:

[08:27:59] Using gulpfile ~\Source\git\app\gulpfile.js
[08:27:59] Starting 'default'...
[08:27:59] Finished 'default' after 11 ms

events.js:160
      throw er; // Unhandled 'error' event
      ^
 Error: Invalid file name at ←[31mC:\Users\NAME\Source\git\app\public
\img\SquareProfile.jpg←[39m :
 > ←[32msquareprofile.jpg←[39m is valid.

Thursday, March 03, 2016

Remote Desktop & Remote Control Raspberry Pi

Introduction

This article discusses how to log into a Raspberry Pi Remote Desktop from a Windows machine and how to Remote Control a Raspberry Pi from a Windows machine.

Remote Desktop Raspberry Pi from Windows

Remote desktop allows you to log into a desktop (i.e. X-Windows session) on your Raspberry Pi. If you have the Raspberry Pi connected to a physical monitor, you will not be logging into that desktop, but a new desktop that will be dedicated to your remote desktop session. For instructions on how to remote control the Raspberry Pi from Windows, see the second half of the article.

Setup Raspberry Pi for Remote Desktop

  1. Startup the Raspberry Pi.
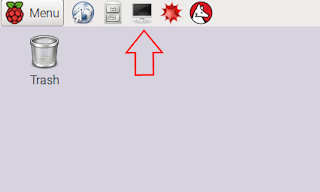
  2. Open a terminal prompt.
  3. Enter the following command to install xrdp (http://www.xrdp.org/):
    sudo apt-get install xrdp

    You may be prompted for your password (the default password for the Raspberry Pi is “raspberry”).
  4. Reboot the Raspberry Pi. The Remote Desktop Protocol server (xrdp sesman) should automatically start on reboot.
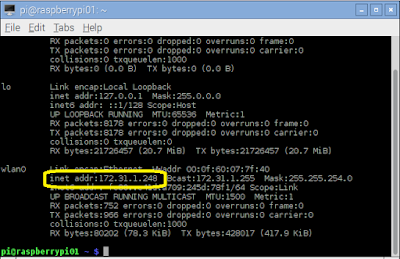
  5. Get the IP address of the Raspberry Pi. This can be done by executing the following command from a terminal prompt:
    ifconfig

Connect From Windows Machine

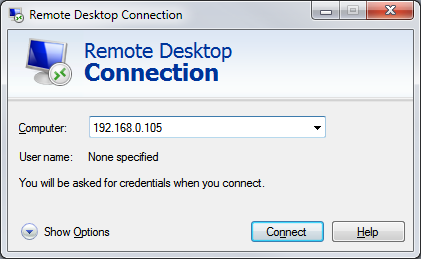
  1. Start the Remote Desktop Connection application.
    • On Windows 7 click Start, All Programs, Accessories, Remote Desktop Connection.
    • On Windows 10 click Start and enter Remote Desktop Connection.
  2. Enter the IP address of the Raspberry Pi in the “Remote Desktop Connection” dialog and click Connect.
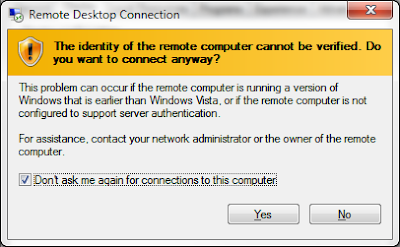
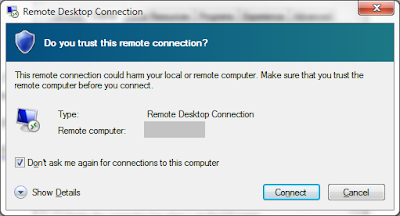
  3. When connecting you may see one or more of the following dialogs:


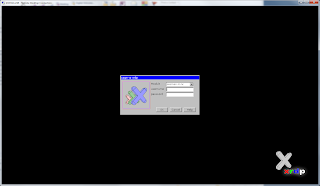
  4. Once connected, a login dialog will be displayed.
  5. Enter a username and password. The default Raspberry Pi username is pi and the default password is raspberry.
  6. Once you are logged in, you should see the Raspberry Pi desktop.

Remote Control Raspberry Pi from Windows

Remote controlling allows you to control the currently active desktop (i.e. X-Windows session) on your Raspberry Pi. With this technique, you can control (e.g. manipulate the mouse & keyboard) the desktop that is shown on the physical monitor that is connected to the Raspberry Pi.

Setup Raspberry Pi for Remote Desktop

  1. Startup the Raspberry Pi.
  2. Open a terminal prompt.
  3. Enter the following command to install x11vnc (http://www.karlrunge.com/x11vnc/):
    sudo apt-get install x11vnc
  4. Enter the following command to set the vnc password. This is the password users will need to enter to remote control the desktop.
    x11vnc –storepasswd
  5. You can test the x11vnc server by entering the following at a terminal prompt.
    x11vnc –usepw
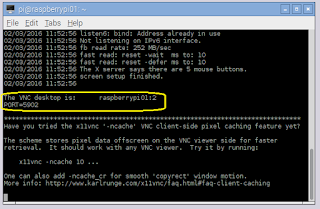
  6. You should see a message like the following on the terminal.

Connect From Windows Machine

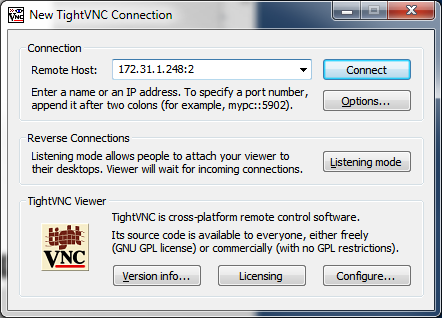
  1. Install a VNC client. In this example I use TightVNC Viewer (http://www.tightvnc.com/download.php).
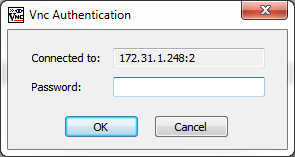
  2. In the VNC client, enter the IP address of the Raspberry Pi followed by a “:” and the display number, which can be found terminal window running x11vnc (this will normally be a 0, but in our example above this is a 2).
  3. Enter the password that was used when setting up x11vnc.
  4. You should now be able to see and interact with the Raspberry Pi desktop.

Automatically Startup x11vnc on the Raspberry Pi

  1. Create the directory ~/.config/autostart, if it does not already exist. This can be done using the following terminal command.
    mkdir –p ~/.config/autostart
  2. Create a text file in this directory, called xterm-autostart.desktop. You can create and edit this file with the following terminal command.
    leafpad ~/.config/autostart/xterm-autostart.desktop
  3. Put the following text into this file.
    [Desktop Entry]
    Encoding=UTF-8
    Name=x11vnc autostart
    Comment=Starts the x11vnc server to allow for remote VNC connections.
    Exec=x11vnc –forever -usepw
  4. Reboot the Raspberry Pi.
  5. Once the Raspberry Pi desktop appears, you should be able to remote control the Raspberry Pi using a VNC Client.